Tandy 2000 Restoration...Twice
December 31, 2018
In 2009, I did sell the Tandy 2000 system below because I really didn't have room for it in the shop. In October 2018, I was lucky enough to come across another, a Tandy 2000HD with single floppy drive, from a gentleman in Texas. No CM-1 monitor or keyboard this time, unfortunately, but more on that later.
This new system (26-5104 serial M5407428; a little later than my original) is configured as follows:
-
Hard Disk Controller (AX-9577) with external connectors. Tandon 10mb hard drive.
-
128k/256k Memory Board (26-5161) with 26-5162 memory option. 512k total RAM.
-
High Resolution Graphics Board (26-5140) with Color Graphics option (26-5141).
-
One open expansion slot -- hoping for a clock/mouse board.
The unit was in overall excellent shape, thanks to the care of the original owner. There is a tag on the side of the unit that indicates it may have been used in a vocational school at some point.
Tasks
This unit didn't include a keyboard, monitor and exhibited problems with the video (a repetitive pattern on the screen), so I had a few things to do.
-
Monitor: Since it had no CM-1 monitor, I hunted around for the only known working alternate (due to the odd 26.4KHz scan frequency), an original NEC Multisync (JC-1401P3A). Through VCF, I located one from a guy in New Jersey - his last one. It was used as a screen on a Telerate stock market terminal.
-
Keyboard: Tandy 2000 keyboards are fairly rare, but according to one of the Tandy Tech Bulletins (2000:43, 4/15/1986) you can use a Tandy 1000 keyboard with minor changes. The T1K keyboard uses an 8-pin DIN rather than a 5-pin DIN, so the tech would simply swap the cables change the INS/DEL key caps. I built an adapter using readily-available DIN connectors and a short piece of shielded cable from an old serial cable. Only 5 lines are needed: Data (1), Busy* (2), Ground (3), Clock (4) and Vcc (5). On the T1K keyboard, pin 6 is RESET and 7 and 8 are N/C. You don't need to do anything with these pins.
-
Video: Given the number of chips involved, I thought this was going to be the hardest, but it wasn't. I correctly guessed that it was likely a problem with the character generator RAM, so I swapped chips U12 and U13 (standard 2kx8, 250nS SRAM chips) and all was good. I didn't have 250nS parts, so I used 150nS (faster is fine). Works perfectly.
Disk Images
This machine is bootable from the hard drive so I made a boot diskette right away (MS-DOS 2.11.03) but I have downloaded a bunch of images to try from tandy2000.com, and I have some of my own from my original system. Using disk images is one of the hardest things to get right because the T2K used a Mitsubishi 720K "quad density" 5.25" drive. I think of it as a half-density 1.2MB drive, or twice a standard 360K double-density drive using the narrower heads of a 1.2MB drive and standard 360K diskettes. It's a "toxic soup" of issues that makes creating and using disk images a hassle. Physical geometry is 9x512x80 G1:24 G2:64 @ 300RPM.
Since these drives are hard to find, people usually use 1.2MB high density drives to create and make images using ImageDisk or other disk imaging programs. I have had success with the following formula:
-
Use only standard, high-quality DSDD 360K diskettes.
-
To account for the difference in spindle speeds of the QD (300RPM) versus HD (360RPM) drives, change the ImageDisk setting for the 250Kbps bit rate to map to 300Kbps (so 250Kbps images are written at 300Kbps). When writing images, ImageDisk has to be set for single-stepping.
Although I haven't tried this, I found this link at Oldskool.org about permanently changing the spindle speed on Teac 1.2MB drives (FD-55GFR) to 300RPM so that the last step above wouldn't be necessary.
Mouse
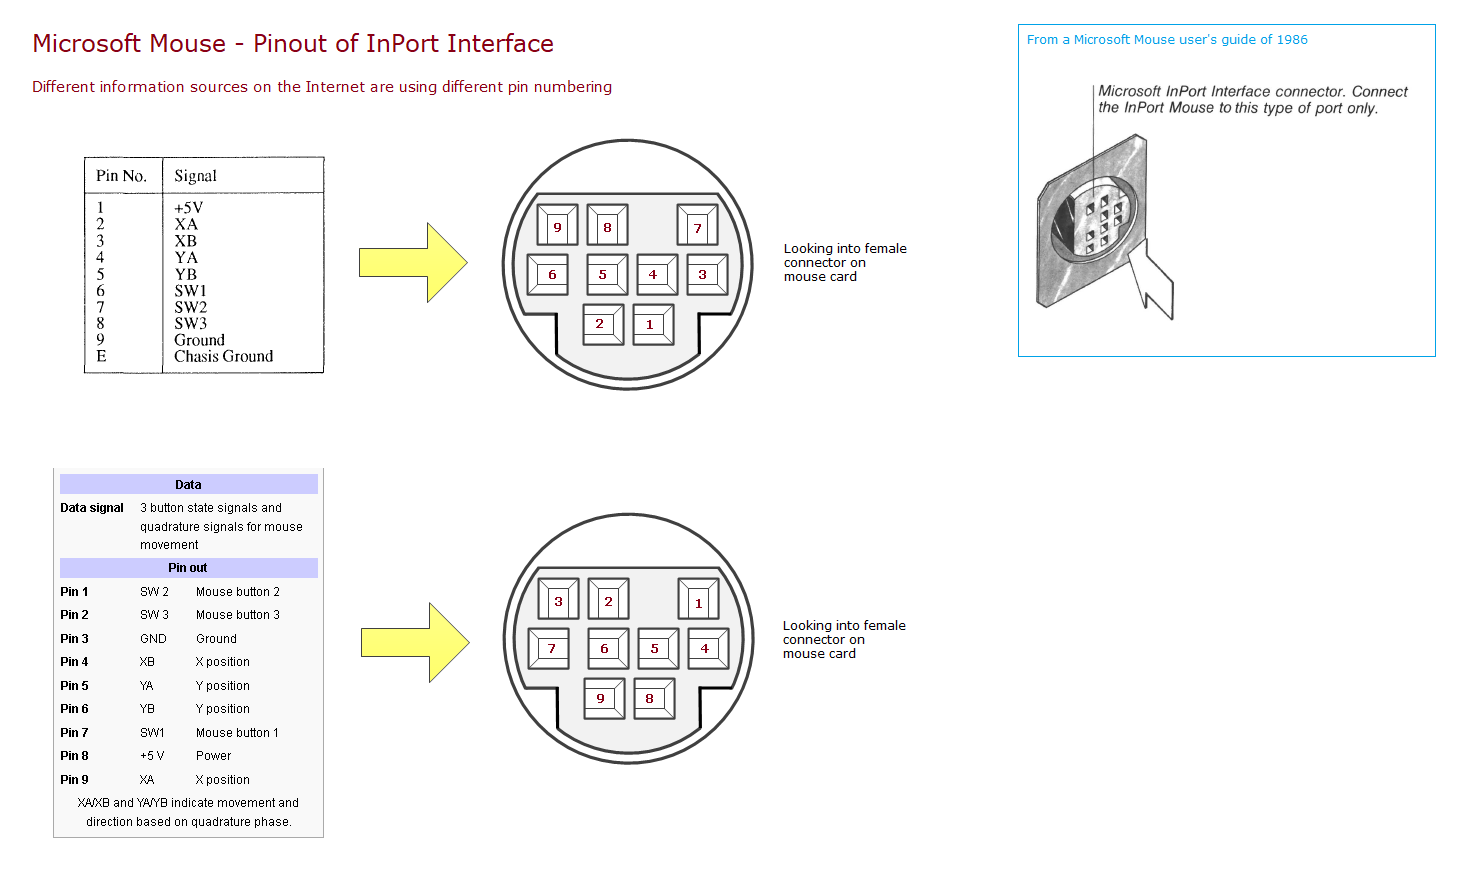
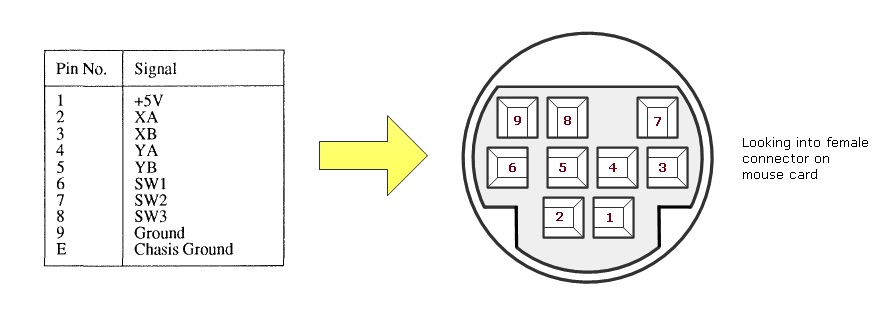
I have disk images for Windows 1.0 and the Tandy Windows driver disk (700-2611) which is the only version known to work. To effectively use it, I need the mouse/clock board and a mouse. Both are fairly rare, but I have read that that it may be possible to take a Microsoft Bus Mouse (Part Number 55307) and use that. The Tandy mouse outputs raw encoder data and switch clicks, so I feel all that is needed is an adapter from the 9-pin mini-DIN connector on the mouse to the DE9M on the mouse/clock board.
In researching this, I came across a graphic on minuszerodegrees.net that indicates that different sources number the Bus Mouse connector differently. The top pinning of that image makes more sense to me, so that's what I'm using. Also, it's from the perspective of the female connector on the Bus Mouse card.
To add insult to injury, there appears to be two different kind of mini-DIN9 connectors, Type A and Type B. The above -- with the space between pins 7 and 8 -- is Type B.
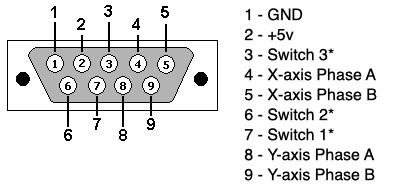
Here is a graphic of the pinout of the mouse port on the T2K board, facing the DE9M connector. When building the cable, only use Switch 1 and 2, leaving Switch 3 (pin 3) not connected.
5/10/19 - I was lucky enough to be able to get a mouse/clock board from a fellow T2K enthusiast from Texas, Jared Hoag. So, I gave it a try and it works! It only marginally passes the T2K Diagnostics (I get a divide overflow), but when running Windows, it works perfectly. So, I attribute it to an anomaly in how the diagnostics read the encoders.
Floppy Drives
It's possible, although a pain, to connect a 3.5" floppy drive to the T2K. Largely the issue is that modern 3.5" drives use pin 34 to signal a "disk change" while on the T2K, pin 34 is the READY* signal from the drive to the controller. There are a few pages on the Internet that discuss this in the context of finding replacement 720K drives for Amiga machines. Older 3.5" drives have more physical jumpers and can be reconfigured more easily; most others require changing the disk select jumper to DS0 (since there is no cable twist) and cutting a trace or two and adding a jumper to reassigning pin 34. Pin 2 of the floppy (Density_Select) is unused on the T2K. The site jope.fi has some great info on this.
I have the following drives "in stock" and they fall into the category of requiring mods to the PCB in order to work.
-
Sony: MPF-520E, MPF-920F
-
Mutsui: D359T5 (although the "T3" version is jumper-configurable)
-
Alps: DF354H-121F
I also purchased on eBay the following based on recommendations from others regarding the ease of configurability:
-
Samsung: SFD-321B. The one I got is an OEM version for IBM (IBM# 33P3326) with a Samsung number of SFD-321B/MBM2. The controller board looks like the one here (the LCP3 sub-version) that's used for an Amiga conversion.
-
Teac: FD-235HF-C829-U5 (certain sub-versions won't work). I can say that this version won't work either -- it has no discernable jumpers on the controller board. It goes into the box with the others...
I also located an external 720K floppy from a Tandy 1000EX (25-1061). This contains a Teac FD-35FN-01-U which has a bunch of jumpers but none that changes pin 34. Arrrgh.
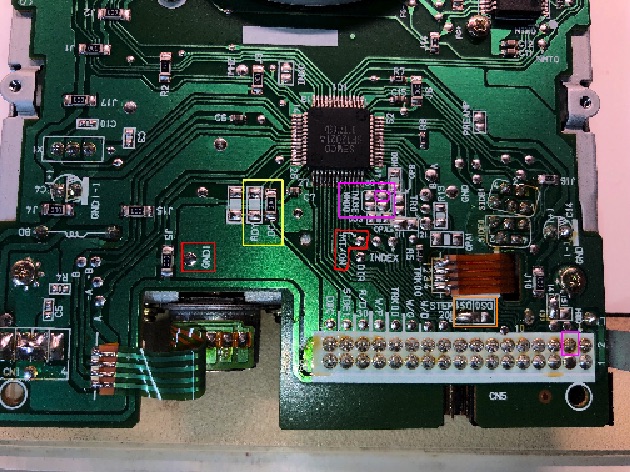
The one I'm focusing on is the SFD-321B. While instructions from above are mostly similar, there is a key difference. Of course you will also need to make a new 2-drive floppy cable with a 34-pin card edge connector and a 34 pin 0.1" header socket. The general modifications are as follows:
-
Switch the DC jumper to RDY (yellow box). That reassigns pin 34 to the "drive ready" signal required by the T2K.
-
If this is the "B" or second drive in the T2K, ensure that the drive select jumper is set for DS1 (orange box).
-
The T2K has an IN_USE signal on pin 4, but the INUSE/NHDD jumper on the drive maps to pin 2. So, you need to remove both jumpers and run a piece of wire from the INUSE signal pad from the chip directly to pin 4 (magenta boxes).
There is one more step which took me several hours to figure out. When testing the drives, the motor would not come on. There is no obvious jumper for "motor on select" (sometimes labeled "MM" or "MS") which would turn the motor on when the drive is selected. This is the way the T2K's Mitsubishi M4853 drives are configured. So, I cheated and just grounded the motor signal on the drive (red boxes).
I'm not 100% sure this is OK to do, but since I don't have the schematic for this drive, it's impossible for me to tell. At worst, U140 (drives the MOTOR_ON signal) on the motherboard would have to be replaced at some point, or maybe it's better to use a small resistor (like 1k) rather than a jumper.
Here's a picture of the drive controller board:
I have a black drive bracket on the way so once I receive that, this project is done.
To use this as a cross-platform transfer mechanism, you need to run:
-
800.COM program from this archive of tools. It's a BIOS wedge that enables DOS to access non-standard formats. Make sure you properly specify the installed drives. So, the command "800/12/14" indicates A:=1.2MB and B:=1.44MB.
-
ZAPMID, also from the above archive, changes the FAT_ID of the diskette from the default to 0xF9, which is the ID for a 1.2MB HD diskette.
After these two steps, the diskette should be accessible from a regular MS-DOS prompt.
====================
August 5, 2007
Ok, so I haven't been so good in keeping up with the log. I've had other projects get in the way, and finding a CM-1 monitor proved to be a huge challenge. Here's what I've accomplished so far:
-
Completed making disk images of all software. Discovered that two of the five Wordstar disks are shot. Other programs which imaged fine include MS-DOS, Lotus 1-2-3, Microsoft Multiplan, pfs:file, and pfs:report. For archival purposes, here is a ZIP file containing the MS-DOS disks from my system.
-
Purchased a second T2K in better physical condition (still white; not a shread of dust anywhere). This unit also suffers from a failed hard drive. According to some stuff I've read, the Tandon TM502 drives are not known for their long-term reliability. Better search for a new drive...
-
Finally located and purchased a CM-1 color monitor. No cable unfortunately.
-
Built replacement HiRes Color cable. This requires a standard DE9M on one side and an EIAJ 8-pin rectangular connector on the other. I used a serial extension cable with one end cut off, and purchased an EIAJ connector from AV Supply Store. Part E8M is the connector and shell. The pinout for the CM-1 monitor is here (from the Tandy FaxBack archive at Oldskool.org). The HiRes Color Card pinout is in the Tandy 2000 FAQ (local copy here). Wiring is obvious. Works perfectly.
-
Purchased Seagate ST-225 (20mb) MFM hard drive to replace the TM502 in one machine. Turns out that the HD controller on one of my T2Ks is bad, so now I'm in Frankenstein mode to get a single working machine. Installed and formatted drive using "HFORMAT c: /s /p". The "/p" switch causes the formatting program to prompt for the drive geometry (613 tracks, 4 heads, interleave=5).
After all of this, I now have a very solid 640k 2000HD system that I also upgraded to dual floppy drives (taking the other from my other machine).
Other things I've discovered:
-
Any MFM drive less than 32mb should work with the 2000HD. The 32mb limit is a limitation within DOS 2.xx. I found a Seagate ST-225 on eBay for $20 and it fit the bill perfectly.
-
If you have a hard drive controller with the external port, the external port will work with any MFM drive so long as the cables are straight-through, the external drive is jumpered for drive 1, and the drive is terminated. Be aware that Pin 7 on the 20-pin data cable carries 12v. This pin is listed as "reserved" for all MFM drives so it shouldn't be a problem. Tandy used this as a power-on signal for the external hard drive enclosure power supply.
-
Poor long-term quality of the Tandon drives. At least for me, the failure mode is the same -- the head positioner servo doesn't move. You do feel back-EMF if you try to move it with the power on, but it doesn't respond to commands. It's a shame too -- both of these drives had software on the for which I don't have disks.
Now that this is done, I have to pull together all of the disk images into one place. Then, I have to scan the Technical Reference Manual. That one is going to be a pain because it's spiral bound. I also want to connect the failed hard drives to an MFM controller in a regular old PC and see if maybe I can waken them.
November 21, 2006
I've made images of most of the disks using Teledisk. Some of the disks, for whatever reason, were not readable. Fortunately, the programs exist on the hard drive so I should be able to regenerate the bad disks from the copies on the hard drive.
The bad news is that the hard drive has become flaky. It worked fine initially but now it spins but doesn't go "ready" so I keep getting "bad unit" errors. Oh well.
I have another MFM drive and I'm hopeful I can get the old drive working one more time so I can copy everything to a new drive.
November 12, 2006
I'm getting closer to powering up the T2k for the first time tonight. The first thing I did was to make copies of the BIOS EPROMs. Indeed, they are TMS2532JL-35 EPROMs. U47 (high/odd) contains a label with "474600" on it. U48 (low/even) contains a label with "484A00". I presume that these are checksums but right now I have no way to tell.
Here is a zip file containing the binary ROM dumps for burning replacements.
After cleaning the keyboard I plugged everything in and gave it a whirl. The machine powered-up without a problem! It reports MS-DOS version 2.11.03 and a BIOS revision of 02.02.00. Perfect!
Next thing for me to do is to make images of all of the disks.
November 11, 2006
I started cleaning the Tandy 2000HD system unit I received (26-5104 serial M5405732). A quick system inventory reveals that it has only one floppy drive in addition to the 10mb hard drive. The expansion card cage contains, from top to bottom, the following cards:
-
Hard Disk Controller (AX-9577)
-
128k/256k Memory Board (26-5161)
-
128k/256k Memory Board (26-5161) with 26-5162 memory option
-
{empty - for the color board I have on order}
This configuration would imply a system with 640k of memory. Not too bad, and more than my first PC had (128k I think).
The system is in good physical shape but the case is severely yellowed and smells musty. I opened the unit and using compressed air and a brush, blew out the dust. I opened the power supply and looked for any obvious signs of previous trouble (none), and then I blew out the dust. Two screws that attach the front fascia to the case were missing so I replaced them.
I gave the outside a quick cleaning with Simple Green just to de-grime it. At this point I turned the system over so I could get to the planar cage. I removed the four screws holding the cage to the case and the two screws that hold the cage to the riser connector and with a little tug to unseat the Euro connector, it hinged upwards. Again, another quick dusting.
The first thing on tap for tomorrow is to remove the two BIOS ROMs and make copies. Interestingly, the ROMs weren't even mask programmed ROMs -- they were TI 2532 EPROMs with a label upon which is printed what appears to be a checksum. According to what I've read, the BIOS version is 02.00.00 but that somehow doesn't reconcile to the fact that they used EPROMs (and it also implies that there were earlier revisions). Tandy made, what, 10,000 or 12,000 of these machines -- each with two EPROMs. It had to be more cost effective to run 20,000 masked ROMs than buy and gang program the same number of EPROMs. Maybe someone can shed some light on this for me.
That's it for now.
Copyright (c) 1998-2023 Richard A. Cini, Jr. (rcini at msn dot com) All Rights Reserved. All copyrights of any third parties referred to herein are hereby acknowledged. There is no warranty, either express or implied, relating to any of the content contained herein. The site maintainer shall in no event be liable to anyone for damages, including any loss of profits, lost savings, or other incidental or consequential damages arising out of the use or misuse of the information contained on this Web site. Batteries not included. You may use the information contained herein for NON-COMMERCIAL purposes only and AT YOUR OWN RISK.
Last updated 2026-04-15 20:07 -0400