- IMSAI 8k BASIC Listing (pdf)
- An Introduction to the DOS-A IMSAI Floppy Disk Operating System (pdf)
- IMSAI/Tarbell Bootstrap Loader (pdf)
- JRT Systems Pascal Reference Manual (pdf)
- MicroPro Word-Master Operators Manual (pdf)
- Mini-article from Dr. Dobb's (9/76:17) regarding "...the memory
clobbering phantom!" (pdf)
- Solid State Music 2P/2S Manual (pdf) (JC)
- Structured Systems Group, Inc. NAD Name and Address System manual (pdf)
- Structured Systems Group, Inc. QSort User's Manual (pdf)
- TDL Z-80 Relocating Macro Assembler User's Manual
(Technical Design Labs) (rev. 1.2; 12/9/76) (pdf)
- TDL Text Editor User's Manual Preliminary (Technical Design Labs) (12/76) (pdf)
- TDL Text Output Processor Manual (Technical Design Labs) (rev. 1.0; 2/14/77)
(pdf)
- TDL Zapple 12k BASIC Version 3 User's Manual (Technical Design Labs) (rev. 0; 1/78)
(pdf)
- TDL Zapple Monitor (Technical Design Labs) (pdf)
- TDL 8k BASIC Manual (Technical Design Labs) (pdf)
- Disk Basic Version 1.06 Documentation Update (Xitan) (pdf)
- Z80-CPU Technical Manual (Zilog) (1976) (pdf)
- Zilog Data Book (Zilog) (1979) (pdf)
- Base2 Z80 CPU Card Manual (pdf)
- Computer Aid Cassette System (pdf)
- IBM Selectric interface schematic (pdf)
- Jade/Ithaca Z80 Errata (pdf)
- National Multiplex 2SIO manual (pdf)
- EPROM: Solid State Music PB-1 (pdf)
- Memory: Vandenberg Data Products 16k SRAM (pdf)
- Modem: PMMI Communications MM-103 Modem and line coupler (pdf)
- Disk Drive System: iCOM "Frugal Floppy" dual 8" drive system.
- iCOM Frugal Floppy CP/M 2.0 Supplement (Computer Mart of New
Jersey-Bruce Ratoff) (pdf)
- iCOM CP/M System Upgrade release notes (pdf)
- Customized CBIOS3 listing for CP/M 2.2 and the iCOM Frugal Floppy (last
date 4/22/81) (pdf)
- CBIOS for CP/M 2.2 and the iCOM Frugal Floppy (might be for my system) (pdf)
- iCOM Warranty Card (pdf)
- Application note: Shadow Modification for iCOM Interface Card (pdf)
- FD400/5XX Service Manual (pdf)
- Synetic Design Company FDS-2 Binder:
- Synetic FDS-2 Core Manual (pdf)
- Operator's Guide - FDOS-II (pdf)
- Operator's Guide - iCOM Macro Assembler (pdf)
- Operator's Guide - Text Editor (pdf)
- Operator's Guide - Text Editor rev. B (pdf)
- FD360/FC360 Controller/Formatter Maintenance Manual (pdf)
- FD360/FC360 Schematic Diagrams (pdf)
- Interfacing Guide for the FD360/FC360 Controller/Formatter (pdf)
- Interfacing Guide for the FD3700 Controller/Formatter (pdf)
- BASIC-M Operator's Manual (pdf)
CP/M and Microsoft Manuals
- CP/M Manual (pdf)
- CREF Cross-reference utility (pdf)
- LIB-80 Librarian (pdf)
- LINK-80 Linker (pdf)
- MACRO-80 Macro Assembler (pdf)
- BASIC-80 Microsoft BASIC 5.0 and greater (pdf)
-
Code
- IMSAI 4k and 8k BASIC (zip)
The Frugal Floppy system that came with the system is a bit flaky. Actually, it's not the
system per se, but the Pertec FD400 floppy drives. So, I wanted to replace this floppy system with one based on 5.25" disk
drives.
Not only is it difficult finding a working controller capable of 5.25" disks
but if
you're lucky enough to find one, it's even harder to find a pre-made working boot disk.
In many circumstances, you can make an image of an 8" diskette using
ImageDisk and take that image and write it onto a 5.25" high-density (1.2mb)
diskette. The drive RPM (360) and transfer rate (500kbps) is the same as an 8"
drive, and
the 5.25" drive is capable of stepping 80 tracks, which is greater than the 77 tracks on 8"
disks.
In advance, I owe a load of thanks to John Singleton, Herb
Johnson, Mike Stein, Tony Duell, and many others on the
ClassicCmp list for their assistance
with this project.
Trying to Fix the Frugal Floppy System
The iCOM "Frugal Floppy" System is a nice dual-8" floppy system. The actual
system is manufactured by Synetic Designs Company but its based on the iCOM
FD360 controller-formatter and Pertec FD400 drives. These are the same drives
used in the original Altair 88-DCDD. FD400 drives have direct-drive DC
spindles and a soft-sectored geometry of 77 tracks containing 26, 128-byte
sectors, for a total of 256,256 bytes.
The controller-formatter is a two-board, totally TTL (i.e., no LSI logic)
controller which connects to the host through a 50-pin non-Shugart-compatible
interface. This cable connects to a host interface card in the host machine. This
card contains some glue logic, buffer RAM and an EPROM.
In this system, the first drive (the top one in the picture above) worked
OK, and the system booted CP/M 1.4 with no problems at all. The bottom
drive worked for a while when I first got it but suffers from CRC errors.
There is a light on the drive cabinet that indicates CRC errors, and I get
nothing but BDOS errors when accessing that drive.
Given this, there are a few procedures that I've done and still have yet to
do:
- Clean the heads. I first used a diskette-based wet cleaner and
that didn't seem to make much of a difference. Next, I plan on cleaning the
heads manually, using isopropyl alcohol and a swab to see if that helps.
-
Check the spindle speed. The
procedure in the manual calls for counting pulses at a tie point on the
controller card. One can also use an optical/non-contact tachometer to check
the speed (which should be 360 RPM). The rub here is that the spindle motor
does not have an optical tach disk ("zebra stripe"), so you have to make one
or copy one from another floppy drive (like the Tandon TM100) and glue it to
the spindle. For convenience, here's a copy of mine.
For the
tachometer, there are several options: neon light connected to 110v/60Hz;
xenon stroboscope; Model 100 Bar Code Reader (Portable 100 magazine,
2/88, p.32). The associated machine language program has to be modified to
count more pulses because we need to count at least one second's worth of
pulses. Further, the BASIC program needs to be modified slightly to have the
math work out right.
Since I had no floppy drive system, I stopped using the IMSAI and moved to
other projects.
In April, 2008, I came across a post on the Vintage
Computer Forums (http://www.vintage-computer.com/vcforum/index.php)
which mentioned a software-based disk drive emulator called the Altair
Peripheral Emulator ("APE") (http://frankbarberis.tech.officelive.com/default.aspx).
APE uses two pieces of software to emulate a CP/M compatible 4-drive floppy
disk system. A Windows program runs on the host machine, which connects to an
S-100 machine through a serial cable. A small boot loader is toggled into the
S-100 machine which loads a secondary boot loader that does the heavy lifting
to get CP/M booted.
I contacted Frank and he is very helpful and was able to create a custom
floppy that matched my S-100 serial port configuration (I/O port location and
status bits). It's a little slow because of the 9600-baud serial connection
but absolutely very functional. If you have a fast enough (4MHz) S-100 machine
and serial card, it is capable of running at 19,200 baud which should be more
than adequate for daily use.
I usually use a Windows-based laptop as a terminal for my classic machines.
For this setup, I use two USB-to-RS232 adapters connected to the two SIO ports
on my IMSAI and I run but Hyperterm and APE on the laptop. Works like a charm.
Thanks, Frank, for a great tool. This held me for a while until I decided that
I needed to refocus on building a floppy system.
May, 2013: as a follow-up, I've pretty much given up on the iCOM floppy
system. The 5.25" drives work well and back in February 2013, I picked up a
Lobo dual-drive 8" floppy drive system which uses SA801R SSSD drives which
can connect directly to the CompuPro Disk 1 controller. The CBIOS will need some
changes, but that's it.
June, 2013: I've donated the entire iCOM drive system to the
MARCH retro-computing group at
InfoAge to which I belong. Although the drive isn't yet connected to MARCH's
ComputerMart IMSAI, it's on display there in the Microcomputer Room.
Implementing a New Disk System
Since the iCOM system didn't work, I was kind of stuck. APE worked but was
kind of slow because of the serial connection. With the help of another hobbyist (John Singleton) who had the
exact same system and had gone through the same process, I was able to
re-implement an 8" disk system from scratch using his CBIOS and method and
5.25" drives. I wrote a complete paper on
this, available as a FAQ
here (MS Word).
Essentially, this project required a few things:
- 64k of memory, less 2k to accommodate the monitor EPROM. I used a
CompuPro RAM17 (pdf) with one of the 6116 SRAM chips replaced with an EPROM. Other
configurations are possible, but essentially the top 4k of memory space is
used for the monitor, CP/M CBIOS, disk buffers and monitor variables.
- A good system monitor program. Calling it a monitor is understating its
capabilities. The FAQ
identifies in detail what capabilities the monitor program needs, but in
addition to "regular" monitor capabilities, it needs the ability to read HEX
files, cold-boot CP/M, write CP/M to disk, format blank disks, and also act
as the CP/M CBIOS.
- A working disk controller board, cabling and drives. I used the CompuPro
Disk 1 controller (pdf)
and YE Data YE-380 1.2mb drives (used in IBM PC/AT
machines). The YE drives are great because they have head load solenoids and
operate just like 8" drives (spindle speed and recording data rate are
the same).
- CP/M 2.2 sources...available from
http://www.cpm.z80.de/source.html (mirror).
This archive has both 8080- and Z80-neumonic source files -- use the
right one for your application.
- CP/M 2.2 "standard" distribution...available from
http://www.retroarchive.org/cpm/os/os.htm (stdcpm22.zip) (mirror)
- CP/M 2.2 assorted patches from cpm.z80.de (mirror)
- CP/M emulator for compiling. I used MyZ80 from the Walnut Creek CP/M
CD-ROM (mirror)
- Lots of patience.
Overall, the project took about two months, but that included acquiring
parts and doing testing. Once I got going, it only took a couple of weeks to
implement and test. Now, I have a complete and fully-working dual-drive system
that uses 5.25" floppy drives to emulate 8" drives. I originally mounted my drives in an
old DEC RX-180 external drive case -- convenient, but not IMSAI obviously. I
subsequently upgraded the case to a slim-line
dual-drive case that fits the drives better than the RX-180 case, which was
designed for full-height drives.
In 2010 and 2014, I made a presentation at two MARCH (now Vintage Computing
Federation) meetings about my experiences. In short, the process involves the
following:
- using the monitor to upload a HEX file version of a memory image of CP/M
to memory
- using the monitor to write CP/M to disk
- using the monitor to upload XMODEM to the diskette
- boot to CP/M and "save" XMODEM to disk
- use XMODEM to transfer *anything* onto the CP/M disk
The presentation files from the meeting are
here.
Other Projects for my IMSAI
Cromemco Dazzler
I pulled out one of the Cromemco Dazzler boards I have
and see if I could get it to work on my IMSAI. Well, with some minor
adjustments, it works just fine. Manuals and software for this graphics
board is on my Altair32 site (Altair32
Docs on Classiccmp).
Cromemco D+7A
Over time, I've been able to acquire a few Cromemco D+7A
analog/digital boards (pdf).
This is a good board, containing 7 analog channels and 8 bits of digital I/O. It
requires calibration, which is a bit time-consuming but doable. I put this in my
IMSAI and ran a DE25F to the back of the chassis to connect to the JS-1 joystick
(pdf) replica
I built. Using the test software in the manual, it works reasonably well but the
screen size is small and it's a bit touchy. I'd say "demo only" rather than
daily use for the Dazzler games.
Modem/Printer
This is my first 2013 project. I pulled out a Cromemco Interfacer 1 (pdf)
and configured both ports for use with the IMSAI. The first port is used as the
LPT device under CP/M and the other as a modem port for MODEM37. This port
connects to an old Hayes Smartmodem 300 which I use to connect to my demo Mystic
BBS system. The printer port connects to a Practical Peripherals Microbuffer (pdf)
which handles serial->parallel conversion.
I don't have any serial printers --
only Centronics parallel printers from Radio Shack and IBM. So, I purchased a Centronics 739-1 printer since
it's reasonably period-appropriate (1978). I can't locate on-line any copies of
a 739-1 manual, but Bill Dromgoole (of the MARCH list) supplied me with a scan
of the 737-1 manual (pdf).
On the surface, it appears to be the same except the paper feeding mechanism and
the lack of a dip switch on the control board.
Thanks Bill!
To digress a bit, there weren't many dot matrix printers advertised for sale
in 1976 and those that were, were mostly over $1,000. So, if you had an IMSAI in 1976,
you probably didn't have a printer unless you were able to get a cast-off
DECWriter or a Teletype that you also used as the console.
By 1978, things were a bit better, with Centronics having several models but
of course, with a parallel interface. OKI (80 or 132 columns), MPI (40-column
receipt-style) and Ohio Scientific had "generic" dot matrix printers. There were
of course serial Teletype machines like the ASR33 or 43 desktop model. The
microcomputer brands Radio Shack had a parallel printer or two that one could use. The other brands (Apple, Commodore
and later, Atari, Coleco and many others) had vendor-specific printers but few
that used compatible interfaces.
By 1979, Diablo had the 1641 daisywheel printer ($2900!!), and Texas
Instruments had the 810 dot matrix ($1599) as well. With these, you could put
that spare parallel I/O port on your console board to use :-) Later OKI and
Epson printers had serial interface board options for some of their printers.
The Centronics 739-1 (serial# 005769, purchased in June 2013 from a gentleman who worked
for Centronics' sales and marketing group) is a
compact 80-column tractor feed printer. It does not use a ribbon cartridge. Instead, it
has a removable Mobius-loop ribbon called a "zip pack" ribbon.
That makes it easy to replace (or now) re-ink. As a side note, the Atari 825
printer was a rebadged Centronics 737-1 with a custom ROM. I was able to find ribbons at
Best Electronics ($6@, limit
2).
I'm still looking for a good re-inking formula. Some use WD-40 to
reinvigorate old ribbons. I might try that first before trying to formulate an
ink from stamp pad ink and sewing machine oil. I've also heard that black shoe
polish might work. I've been contact with a few typewriter restorers about this
topic...maybe I'll get the secret formula!
6/14/13: I finished building the cable for the printer. It's actually pretty easy but
you can't use a DB25 IDC connector on the buffer side because the pinning isn't
right. The printer side is a 40-pin card edge connector (such as CW Industries
CWR-170-40-0000). It's not as common as the 34-pin one used for floppy
drives but it is available. Use 25-conductor ribbon cable and a DB25M connector with solder cups.
Basically, all even pins (2-24) from the printer connect to ground. All odd pins
connect sequentially to the DB25M (C40::DB25, as follows: 1-1, 3-2, 5-3, etc.).
The remaining pins should remain unconnected, especially 35, 37 and 39 since
they carry 5v and 17v, respectively, from the printer.
After making up the cable, I connected it to the buffer, fired up CP/M and
printed a text file. Success!
GI Orator Speech Board
In mid-2012, I picked up a General Instruments Orator demonstration board (pdf).
This board uses the SP0256-AL2 speech processor in a demo or "reference board"
configuration. I haven't tried it with the IMSAI yet, but soon. I did some basic
testing and it works so it's a matter of connecting it to the IMSAI.
Reimplementing an 8" Drive System
2016: I had some free time so I began restoring and implementing an 8" floppy drive
system for the IMSAI. This builds heavily on the existing CBIOS and previous
implementation work for the 5.25" system. Part of the game plan here is getting
the system to read the 100 or so 8" disks that I have from the IMSAI. I'm not
quite sure it will work, but I'm hopeful.
The system will continue to use the CompuPro Disk 1 controller with the Lobo
drive system. The Lobo drive system is very simple -- a power supply and two
Shugart SA-801R SSDD drives (Maintenance
Manual;
User's Guide). The drives are jumpered to force them to single-density to be
compatible with the existing disks. Maybe eventually I'll make them
double-density.
Changes this time involved:
- changing the disk structures to match those for SSSD drives
- changing the XLAT table to the standard for SSSD.
- undoing the double-sided code in FORMAT and PROCESS
- minor changes to the punch/reader to support XMODEM (source)
transfers. This was adapted from the utility used with the N8VEM board which
uses the PUN/RDR devices to implement the XMODEM file transfers.
Overall the CBIOS changes weren't too difficult. However, I discovered that
one of the drives drops in and out of READY. Fortunately the other drive works
well, so now I have a single-drive system. I was able to get another drive on
eBay, so I'm hopeful I can get a second drive up and running and give me the
chance to fix the other drive.
I've shelved this part of the project for a while in favor of building a
Seattle Gazelle-replica system for an early MS-DOS project. That project is
detailed here.
Copyright (c) 1998-2023 Richard A. Cini, Jr. (rcini at msn dot com) All Rights Reserved.
All copyrights of any third parties
referred to herein are hereby acknowledged. There is no warranty, either
express or implied, relating to any of the content contained herein. The site maintainer
shall in no event be liable to anyone for damages, including any loss of profits, lost
savings, or other incidental or consequential damages arising out of the use or misuse of
the information contained on this Web site. Batteries not included. You may use the information contained
herein for NON-COMMERCIAL purposes only and AT YOUR OWN RISK.
Last Updated
04/15/2026 20:08 -0400
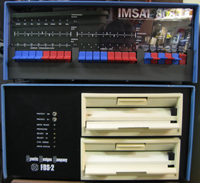 (My system right after I got it)